
Converting a Visual Studio database project to use DbUp migrations
Database projects in Visual Studio have been a very popular way to develop and manage the database schema and logic in the past. With more and more applications now preferring to have the data tier logic and validation within the bounds of the application and use the database just for persistence, I’ve come across clients who want to convert their database projects to a more CI/CD friendly database migrations.
So I decided to share an approach used to convert existing database project to use database migrations using DbUp I’ve had success with.
Why Migrations?
Because Transitions are easier to manage than States.
Visual Studio database projects rely on state comparison (called diffs) to compare your source and target schemas and come up with a deployment script. While these auto generated scripts are very good they aren’t perfect. The tooling can’t always create scripts for all the state transitions without causing inconsistencies (data loss etc). This makes it impossible to integrate them into an automated deployment pipeline with confidence.
Migrations on the other hand rely on transitions. Humans write code for the transitions. We can then have an automated process run the transitions to get the target database up to date.
The philosophy behind this is looked at in detail here.
Why DbUp?
DbUp is a .NET library that helps you to deploy changes to SQL Server databases. It tracks which SQL scripts have been run already, and runs the change scripts that are needed to get your database up to date.
I’ve used tool like FluentMigrator to implement migrations before as well. But I like the simplicity and support DbUp provides. This at the end of the day is just personal preference.
Forward-only migrations
DbUp doesn’t support down migrations though. IMO this is a good design decision. Down migrations are rarely tested and often only give a false sense of confidence of ability to rollback. If your up migration fails then the same set of data might cause your down migration to fail as well. To add to that not all migrations can have a paired down migration to consistently rollback changes. My preference is to have discipline around how you do migrations and not do destructive data changes in a single migration step.
As an example if I wanted to refactor a single FullName field into FirstName and LastName columns, I wouldn’t delete the FullName column in the same migration that I introduce the other two columns. In the first migration I would introduce the columns, copy the data over and then rename the FullName column to something like FullName-Deprecated. I would then let the system run for a while until we are confident that everything is working as intended. If not, you can then create subsequent migrations to rectify the problems as you still have data in the original column. After a certain period, I would then create another migration to get rid of the now deprecated column. This gives greater resiliency to the system and allows you to be more confident about changes you do.
Preparation
-
We need to create our initial migration and the easiest way to do this is to consider your current state of the database as the initial state as far as the migrations are concerned.
This means exporting all your database objects to a script. You can do this from SQL Server Management Studio (SSMS). Follow the steps here to
Generate Scriptsfor all database objects you require to be created as a part of the initial migration (Tables, Views, Stored Procs, Functions etc).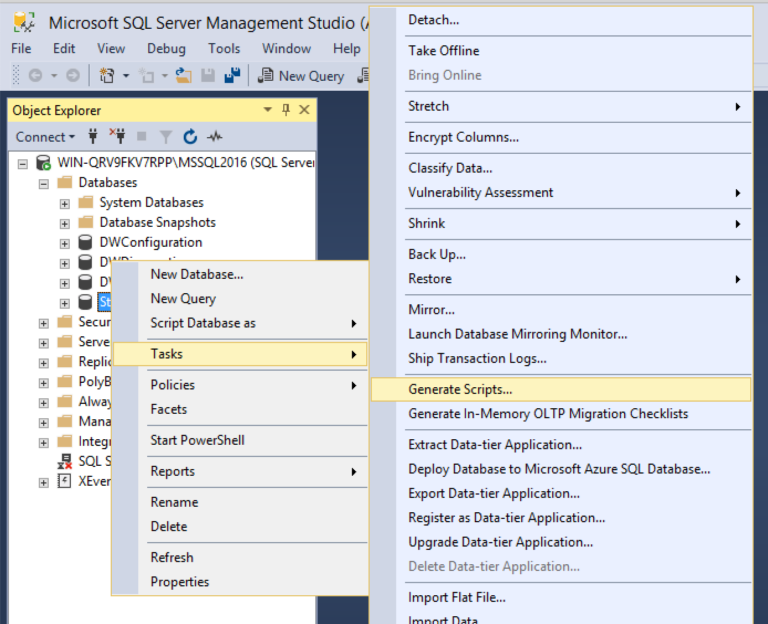
Save this file as
Initial_Migration.sql. Once exported open the file and remove any SQL statements at the begining that create the Database or Logins. Lets assume the migrations are run on an empty database that has already been created. - Now repeat the same steps as above with the following changes…
- Only select Functions and Stored Procedures to export this time as we need them to be PR review friendly. More about this later on.
- In the last window, go to
Advanced-> Scripting Options -> setCheck for object existancetoTrue. Press OK. -
Now choose the option to create a
Single file per object. (Remember we exported everything in to one file file in the previous step, we are exporting a subset of those things again to their individual files.) -
Save these in a folder called
PostDeployment.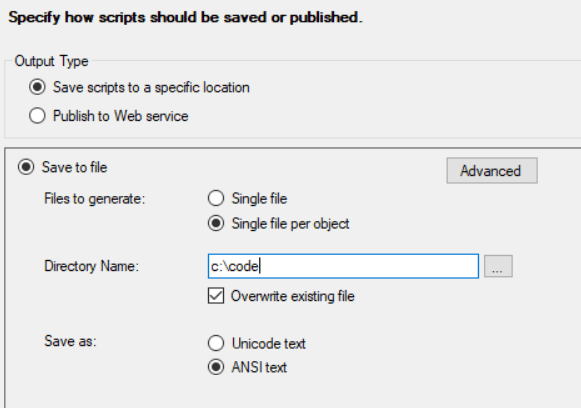
Why are we duplicating the Stored Procedures in our all-in-one script and again in the individual files?
Imagine that we only used migrations and no post deployment scripts. Unlike Table or View schemas you can’t alter a part of a Stored Procedure. So if you need to make a change you need to create a new migration with the full stored procedure definition. The person reviewing your change sees a new file and not just your change. It becomes very hard to review changes this way.
So we will use these one file per object scripts to create reviewable post deployment scripts in our migration project. The idea is you keep modifying these post deployment scripts (Stored Procedures and Functions) rather than create a new migration for them. So the reviewer sees only your change in the context of the larger set. This will be very helpful if you have large Stored Procedures in your database project.
There is more detail around the idea here.
-
You should now have one big SQL file called
Initial_Migration.sqland lot of smaller SQL files per Stored Procedure in thePostDeploymentfolder. Now we need to give the files inside that folder a sequence number. For example if your file is calledCreateCustomer.sqlwe need to rename it to000001 - CreateCustomer.sqland anything that depends on this script must have a sequence/order number higher than000001. (This is because DbUp executes the scripts in their name order. We use the name as a way to enforce dependency order for post deployment scripts.)If you have a lot of files, it will be time consuming to do this manually. So I used this BulkRenaming tool to put the sequence/order suffix. I set it so that it suffixed files in increments of 5 (So sequence is 1, 6, 11, 16 etc). Once this was done I could then manually set the dependent order (by renaming the suffix manually) as required without having to rename every subsequent file. This is because the increment by 5 meant I could squeeze 4 more files between two other scripts if required. You might need a bit of manual effort here depending on how interconnected your Stored Procedures are.
DbUp Migration Runner
-
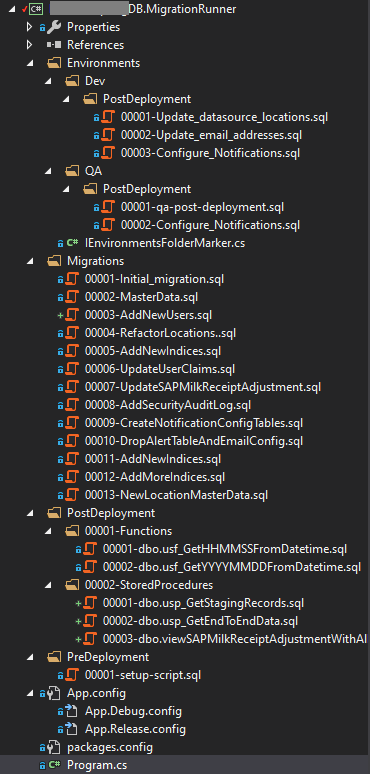
The folder structure for the migration runner is as follows. This is a simple console app targeting .NET framework but it’s trivial to change this to work with .NET Core.
-
As you can see I put the
Initial_Migration.sqlin theMigrationsfolder and prefixed it with000001. All subsequent migration will have the next sequence. -
I also have
PostDeploymentandPreDeploymentfolders. I’ve organized Stored Procedures and Functions in their own respective folders but that is optional. This is where you need to put the individually exported SQL files (PostDeploymentfolder) from our preparation steps before. -
There are environment specific folders which also have their own specific Pre and Post deployment folders. This gives you the ability to do customisations based on the environment if required. Once you see the migration runner code it will make more sense.
-
DbUp uses the fully qualified file name with the namespace to figure out the order of execution and we make use of the filename suffix or nested folders (Namespace) to enforce our desired order.
-
-
I use config transforms to transform the
AppConfigbased on the build quality via the SlowCheetah extension.App.config
 <?xml version="1.0" encoding="utf-8" ?>
 <configuration>
 <startup>
     <supportedRuntime version="v4.0" sku=".NETFramework,Version=v4.7.2" />
 </startup>
 <connectionStrings>
     <add name="MyConnectionString" connectionString="Integrated Security=SSPI;Initial Catalog=MyDatabase;Data Source=.;" providerName="System.Data.SqlClient"/>
 </connectionStrings>
 <appSettings>
     <add key="AdditionalPreDeploymentNamespace" value="" />
     <add key="AdditionalPostDeploymentNamespace" value="" />
     <add key="Environment" value="" />
 </appSettings>
 </configuration>
App.Debug.config
 <?xml version="1.0" encoding="utf-8"?>
 <configuration xmlns:xdt="http://schemas.microsoft.com/XML-Document-Transform">
 <appSettings>
     <add key="AdditionalPreDeploymentNamespace" value="Dev.PreDeployment" xdt:Transform="SetAttributes" xdt:Locator="Match(key)"/>
     <add key="AdditionalPostDeploymentNamespace" value="Dev.PostDeployment" xdt:Transform="SetAttributes" xdt:Locator="Match(key)"/>
     <add key="Environment" value="Dev" xdt:Transform="SetAttributes" xdt:Locator="Match(key)"/>
 </appSettings>
 </configuration>
App.Release.config
 <?xml version="1.0" encoding="utf-8"?>
 <configuration xmlns:xdt="http://schemas.microsoft.com/XML-Document-Transform">
 <connectionStrings>
     <add name="MyConnectionString" connectionString="#{databaseConnectionString}#" providerName="System.Data.SqlClient" xdt:Transform="SetAttributes" xdt:Locator="Match(name)" />
 </connectionStrings>
 <appSettings>
     <add key="AdditionalPreDeploymentNamespace" value="#{releaseEnvironment}#.PreDeployment" xdt:Transform="SetAttributes" xdt:Locator="Match(key)"/>
     <add key="AdditionalPostDeploymentNamespace" value="#{releaseEnvironment}#.PostDeployment" xdt:Transform="SetAttributes" xdt:Locator="Match(key)"/>
     <add key="Environment" value="#{releaseEnvironment}#" xdt:Transform="SetAttributes" xdt:Locator="Match(key)"/>
 </appSettings>
 </configuration>
My release pipeline injects the
databaseConnectionStringandreleaseEnvironmentvariables in to theApp.Release.config/AppName.exe.Configfile upon building/deploying the app. That is why you see tokens like#{databaseConnectionString}#. I use this extension in Azure DevOps to do it.When running locally with the
Debugbuild qualityMSBuilduses theApp.Debug.Configto transform your original config file. So you can easily run and test the migration runner locally. This makes your local development exprience consistent among the team. No more complex database update scripts to run. -
Now let’s look at my migration runner (
Program.cs). You obviously need a reference to theDbUp-SqlServerNuGet as we use it to do the heavy lifting.
static class Program
{
    static int Main(string[] args)
    {
        var noWait = false;

        if (args.Length == 1 && args[0] == "--nowait")
        {
            noWait = true;
        }

        int exitCode = 0;

        try
        {
            WriteToConsole($"Database Migration Runner. " +
             $"Version={typeof(IEnvironmentsFolderMarker).Assembly.GetName().Version}");

            // NOTE: PLEASE MAKE SURE YOUR SCRIPT IS MARKED AS EMBEDDED
            // https://www.c-sharpcorner.com/uploadfile/40e97e/saving-an-embedded-file-in-C-Sharp/
            WriteToConsole("\nIMPORTANT: Please ensure your scripts are EMBEDDED in the executable.");

            var baseNamespace = typeof(Program).Namespace;
            var baseEnvironmentsNamespace = typeof(IEnvironmentsFolderMarker).Namespace;

            // You can use IConfiguration (Microsoft.Extensions.Configuration) to
            // achieve the same thing in a .NET Core project as shown here
            // https://stackoverflow.com/questions/38114761/asp-net-core-configuration-for-net-core-console-application

            var additionalPreDeploymentNamespace =
                ConfigurationManager.AppSettings["AdditionalPreDeploymentNamespace"];
            var additionalPostDeploymentNamespace =
                ConfigurationManager.AppSettings["AdditionalPostDeploymentNamespace"];
            var connectionString =
                ConfigurationManager.ConnectionStrings["MyConnectionString"];

            WriteToConsole("\nListing variables...\n");
            var variables = new Dictionary<string, string>();

            foreach (var k in ConfigurationManager.AppSettings.AllKeys)
            {
                variables.Add(k, ConfigurationManager.AppSettings[k]);
                WriteToConsole($"${k}$ = \"{ConfigurationManager.AppSettings[k]}\"");
                // See how to use variables in your scripts:
                // https://dbup.readthedocs.io/en/latest/more-info/variable-substitution/
            }

            if (!string.IsNullOrWhiteSpace(additionalPreDeploymentNamespace))
            {
                additionalPreDeploymentNamespace = baseEnvironmentsNamespace +
                     "." + additionalPreDeploymentNamespace;
            }

            if (!string.IsNullOrWhiteSpace(additionalPostDeploymentNamespace))
            {
                additionalPostDeploymentNamespace = baseEnvironmentsNamespace +
                     "." + additionalPostDeploymentNamespace;
            }

            if (!noWait)
            {
                Console.Write("\nPress return to run scripts...");
                Console.ReadLine();
            }

            // Pre deployments
            WriteToConsole("Start executing predeployment scripts...");
            string preDeploymentScriptsPath = baseNamespace + ".PreDeployment";
            RunMigrations(connectionString,
                preDeploymentScriptsPath, variables, true);

            if (!string.IsNullOrWhiteSpace(additionalPreDeploymentNamespace))
            {
                RunMigrations(connectionString,
                    additionalPreDeploymentNamespace, variables, true);
            }

            // Migrations
            WriteToConsole("Start executing migration scripts...");
            var migrationScriptsPath = baseNamespace + ".Migrations";
            RunMigrations(connectionString,
                migrationScriptsPath, variables, false);

            // Post deployments
            WriteToConsole("Start executing postdeployment scripts...");
            string postdeploymentScriptsPath = baseNamespace + ".PostDeployment";
            RunMigrations(connectionString,
                postdeploymentScriptsPath, variables, true);

            if (!string.IsNullOrWhiteSpace(additionalPostDeploymentNamespace))
            {
                RunMigrations(connectionString,
                    additionalPostDeploymentNamespace, variables, true);
            }
        }
        catch (Exception e)
        {
            WriteToConsole(e.Message, ConsoleColor.Red);

            exitCode = -1;
        }

        if (!noWait)
        {
            Console.Write("Press return key to exit...");
            Console.ResetColor();
            Console.ReadKey();
        }

        return exitCode;
    }

    private static int RunMigrations(string connectionString,
        string @namespace,
        Dictionary<string, string> variables,
        bool alwaysRun = false)
    {
        WriteToConsole($"Executing scripts in {@namespace}");

        var builder = DeployChanges.To
            .SqlDatabase(connectionString)
            .WithVariables(variables)
            .WithScriptsEmbeddedInAssembly(
                Assembly.GetExecutingAssembly(), file =>
            {
                return file
                    .ToLower()
                    .StartsWith(@namespace.ToLower());
            })
            .LogToConsole();

        builder = alwaysRun ?
             builder.JournalTo(new NullJournal()) :
             builder.JournalToSqlTable("dbo", "DatabaseMigrations");

        var executor = builder.Build();
        var result = executor.PerformUpgrade();

        if (!result.Successful)
        {
            throw new Exception(result.Error.ToString());
        }

        ShowSuccess();
        return 0;
    }

    private static void ShowSuccess()
    {
        WriteToConsole("Success!", ConsoleColor.Green);
    }

    private static void WriteToConsole(string msg,
         ConsoleColor color = ConsoleColor.Green)
    {
        Console.ForegroundColor = color;
        Console.WriteLine(msg);
        Console.ResetColor();
    }
}
Running the migration runner
You can run it manually (From Visual Studio or Opening the executable file) or run it as a part of your release pipeline with the --nowait argument.
Before you run it for the first time make sure to drop the existing database and create an empty database with the same name in the connection string.
That’s it. You now have all the pieces required to convert your database project to one that uses database migrations instead.
Conclusion
We looked at why database migrations offer us a better alternative when it comes to maintaining and deploying database changes, how to export your existing database as migrations and post deployment scripts, how to structure your migration runner and how it can work in an automated release pipeline.
Most of the steps we took are no different to how you would structure any other database migrations project. The interesting bit was how we leveraged the concept of post deployment scripts to put our Stored Procedures in and made the PR review process much more easier. This will make the process of conversion a much more acceptable prospect for a team that has been working with database projects and Stored Procedures in the past. I’ve had good traction with this approach at a couple of clients I’ve consulted for.
Please leave any comments or feedback you have here.


Leave a comment