
OAuth Client Credentials Flow With AzureAD
Navigating through the various authentication and authorization flows in AzureAD can sometimes be confusing. The Microsoft documentation on app types is a good place to start.
Today we will be looking at the client credentials grant flow. The Microsoft documentation around the flow with regards to AzureAD can be found here. They have named the document Service to service calls using client credentials which is what the client credentials grant is used for.
It is a prerequisite of this post that you know the basics of AzureAD and how to create an App Registration in an AzureAD Tenant.
What is the client credentials grant used for?
The Microsoft documentation gives a good explanation.
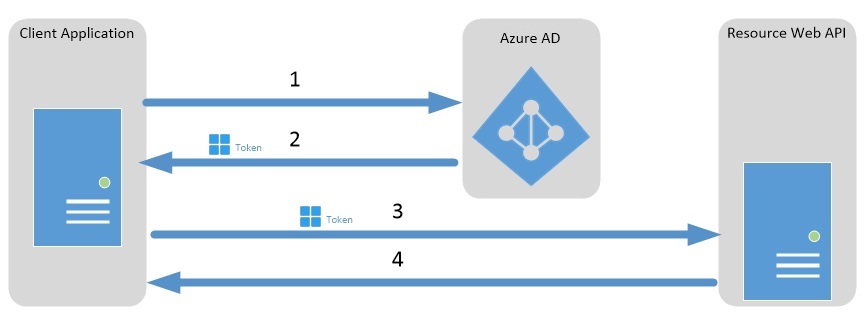
The OAuth 2.0 Client Credentials Grant Flow permits a web service (confidential client) to use its own credentials instead of impersonating a user, to authenticate when calling another web service. In this scenario, the client is typically a middle-tier web service, a daemon service, or web site. For a higher level of assurance, Azure AD also allows the calling service to use a certificate (instead of a shared secret) as a credential.
It’s basically the OAuth flow when you have a back end system needing to access another down stream service.
Azure AD Setup
The examples I’m about to give are based on the shared secret but most of it applies to the certificate based grant as well.
-
Create a tenant and 2 app registrations on it. I’ve called one
DemoResourceAppand the otherDemoClientApp.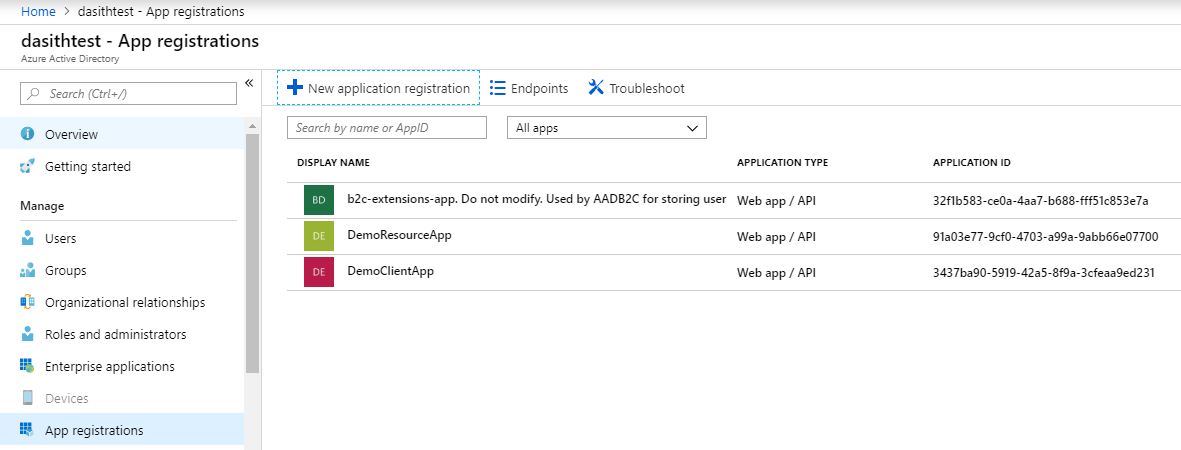
-
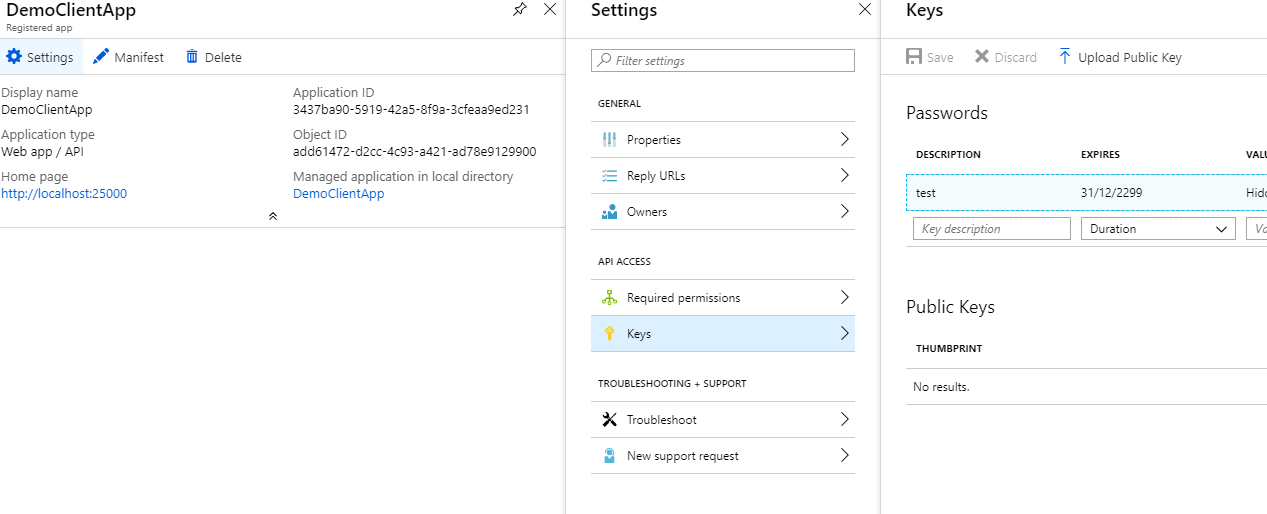
Create a key for the client app and keep it stored somewhere for later.
-
We need to edit the
Manifestof the resource app. For demo purposes I’ll add 2 roles: one for reading and one for writing.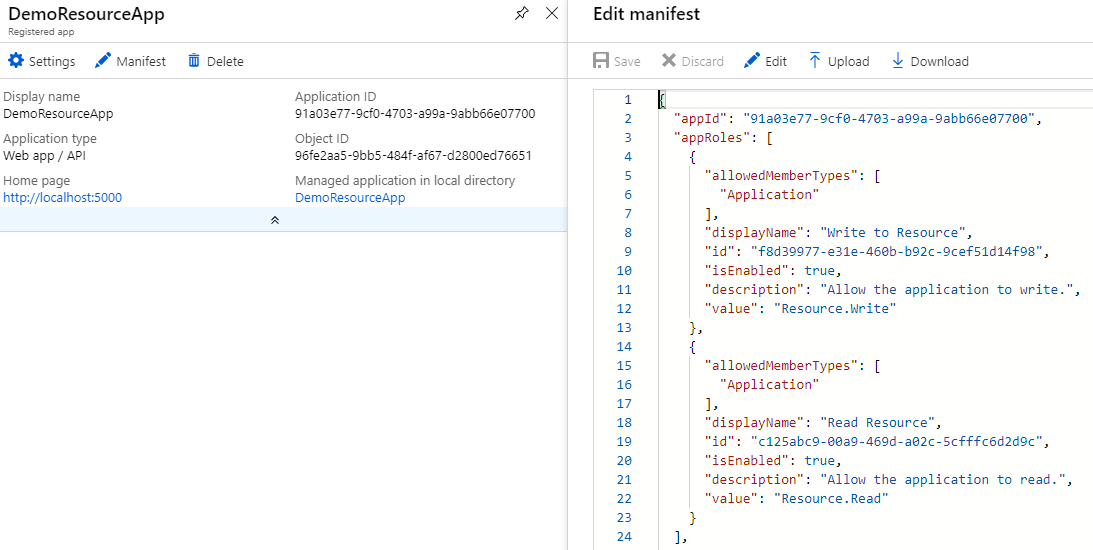
 "appRoles": [
     {
     "allowedMemberTypes": [
         "Application"
     ],
     "displayName": "Write to Resource",
     "id": "f8d39977-e31e-460b-b92c-9cef51d14f98",
     "isEnabled": true,
     "description": "Allow the application to write.",
     "value": "Resource.Write"
     },
     {
     "allowedMemberTypes": [
         "Application"
     ],
     "displayName": "Read Resource",
     "id": "c125abc9-00a9-469d-a02c-5cfffc6d2d9c",
     "isEnabled": true,
     "description": "Allow the application to read.",
     "value": "Resource.Read"
     }
 ], ... other settings
Note: Make sure the
idfield above for the roles are unique. Use a GUID generator to generate them. -
The last thing we need to do on the AzureAD portal is to grant the Client app the 2 roles we created in the previous step.
- Open up the
DemoClientApppane and clickSettingsto open the settings pane. - Click
Required Permissionsand then the+ Addbutton. - Select the
DemoResourceAppAPI and then select both the permissions from the list. -
Important: Once the roles are selected and saved, hit the
Grant Permissionsbutton to do exactly that and grant the application the selected permissions. This requires admin access.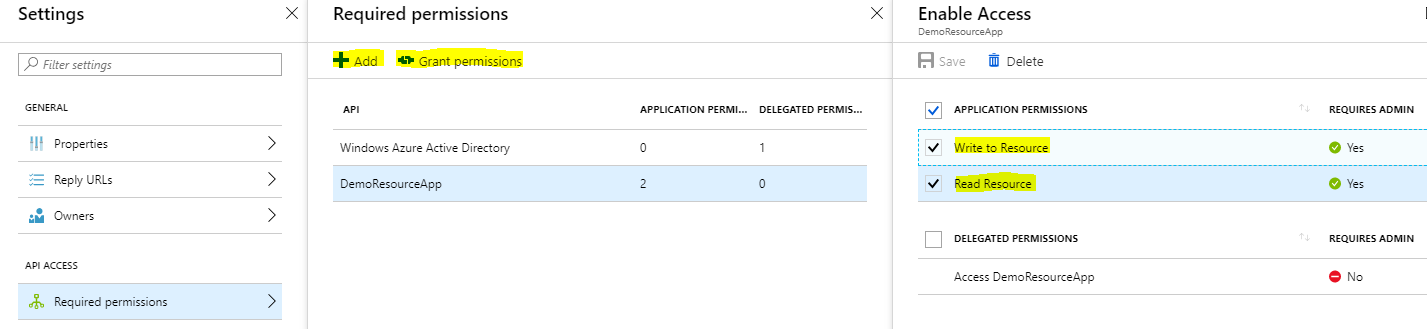
- Open up the
Now that we have AzureAD configured, we need to write the app logic. I’m going to create 2 ASP.NET core 2.1 web api projects to demonstrate the use. One will act as the resource and the other as the client.
Application Logic For DemoResourceApp
Important: You will need to take a dependency on the Microsoft.AspNetCore.Authentication.AzureAD.UI NuGet package.
If you’re unfamiliar with policy based authorization in ASP.NET core, please have a read of this before continuing.
- Decorate your controller with the
Authorizeattribute.[Route("api/[controller]")] [ApiController] [Authorize("WritePolicy")] // Policy name is WritePolicy public class MyController : ControllerBase { // Your methods go here } - Add the authorization requirement.
public class WriteRequirement : IAuthorizationRequirement { public WriteRequirement() { } } - Add the requirement handler to handle the requirement we introduced.
 public class WriteRequirementHandler : AuthorizationHandler<WriteRequirement>
 {
     public WriteRequirementHandler()
     {
     }

     protected override Task HandleRequirementAsync(AuthorizationHandlerContext context, WriteRequirement requirement)
     {
         if (context.User.IsInRole("Resource.Write")) // Same role name as in manifest
         {
             context.Succeed(requirement);
         }
         return Task.CompletedTask;
     }
 }
Note: You can do
[Authorize(Role = "Resource.Write")]if you don’t want to use a custom policy but I like the freedom the policy gives me to use my own logic if the authorization requirement gets complex. -
Update your
Startup.csto include the authorization middleware and to accept bearer tokens.I Like to keep the auth logic in a seperate class. I created these extension methods.
 public static class AzureAdModule
 {
     public static void SetupAzureAdAuthorization(this IServiceCollection services)
     {
         services.AddAuthorization(options =>
         {
             var writeRequirement = new WriteRequirement();
             options.AddPolicy("WritePolicy",
                 customPolicy => customPolicy.Requirements.Add(writeRequirement));
         });

         services.AddSingleton<IAuthorizationHandler, WriteRequirementHandler>();
     }

     public static void SetupAzureAdAuthentication(this IServiceCollection services, IConfiguration configuration)
     {
         services.AddAuthentication(AzureADDefaults.BearerAuthenticationScheme)
             .AddAzureADBearer(options =>
             {
                 configuration.Bind("AzureAd", options);
             });
     }
 }
Update the
ConfigureServices()method to use those two extension methods.public void ConfigureServices(IServiceCollection services) { // Setup your other services here services.SetupAzureAdAuthentication(Configuration); services.SetupAzureAdAuthorization(); }Update the
Configure()method to include the authentication.public void Configure(IApplicationBuilder app, IHostingEnvironment env, ILoggerFactory loggerFactory) { app.UseAuthentication(); // This should be before the UseMvc line app.UseMvc(); } - Finally, update the
appsettings.jsonwith the AzureAD app registration information. Replace the placeholders with the correct names and ids.{ "AzureAd": { "Instance": "https://login.microsoftonline.com/", "Domain": "ReplaceWithYourTenantName.onmicrosoft.com", "TenantId": "Your Tenant Id, This is a guid", "ClientId": "Your DemoResourceApp AppId, This is a guid" } }This concludes what’s required in the DemoResourceApp. Let’s look at what’s required for the Client now.
Application Logic For DemoClientApp
For the client app to call an endpoint on the resource, it would require a token from AzureAD first. This token will be retrieved using the shared secret (or certificate). The received token will have the claim with the app roles the client app has been granted. This token will then be passed in the header whenever the client app calls an endpoint on the resource app.
You can simply get the token by making a POST request as shown below:
POST /contoso.com/oauth2/token HTTP/1.1
Host: login.microsoftonline.com
Content-Type: application/x-www-form-urlencoded

grant_type=client_credentials&client_id=625bc9f6-3bf6-4b6d-94ba-e97cf07a22de&client_secret=qkDwDJlDfig2IpeuUZYKH1Wb8q1V0ju6sILxQQqhJ+s=&resource=https%3A%2F%2Fservice.contoso.com%2F
Note: We are using the V1.0 endpoint (with ADAL) here. If you want to use the V2.0 endpoint please have a read of the Microsoft docs and checkout this code example using MSAL for the Client Credentials flow.
For completeness, let’s examine how you can do it via the AzureAD Authentication Library (ADAL). The code samples are below.
- Retrieving the token should be easy using this little helper class. You will need to take a dependency on the
Microsoft.IdentityModel.Clients.ActiveDirectoryNuGet package.public sealed class AzureAdTokenRetriever { public async Task<string> RetrieveTokenAsync() { var addInstance = "https://login.microsoftonline.com/{0}"; var tenant = "Your tenant name here"; var clientId = "DemoClientApp Id from AzureAd. This is a guid."; var appKey = "The key we saved when we created the app registration for DemoClientApp"; var resourceId = "DemoResourceApp Id from AzureAd, This is a guid." var authority = string.Format(CultureInfo.InvariantCulture, aadInstance, tenant); var authContext = new AuthenticationContext(authority); var clientCredential = new ClientCredential(clientId, appKey); AuthenticationResult result; try { result = await authContext.AcquireTokenAsync(resourceId, clientCredential); } catch (AdalException e) { Log.Error($"Error while fetching bearer token from client {clientId} to resource {resourceId}"); throw; } return result.AccessToken; } } - Now we call the
DemoResourceAppendpoint with the token in the header.public async Task<HttpResponseMessage> CallSomeEndpoint() { var request = new HttpRequestMessage { RequestUri = new Uri($"the url of where the resource app endpoint is"), Method = HtppMethod.Get // or whatever the http method is }; var azureAdTokenRetriever = new AzureAdTokenRetriever(); var token = await azureAdTokenRetriever.RetrieveTokenAsync(); // We attach it as a bearer token in an Authorization header request.Headers.Add(HttpRequestHeader.Authorization.ToString(), $"Bearer {token}"); var httpClient = new HttpClient(); return await httpClient.SendAsync(request); }That’s it. We’ve implemented the OAuth Client Credentials flow using AzureAD. You can now try to incoorperate the same logic for the
Resource.Readrole to check if you’ve learnt the pattern. Good luck!
Final Notes
This is not production ready code. The priority here was to show an example in the most simple form. Please consider refactoring the code and DRYing it before using it in any production scenarios. Please make sure you secure the shared secret in the CI/CD pipeline.
In the development environment you can even have the AuthorizationHandler’s succeed without a token/claims present if you don’t want the burden of having to retrieve tokens when debugging. There are many ways to do it. This model is really flexible.
I hope this has helped you. Please leave any feedback you have as it helps me become a better writer. Thank you for your time.


Leave a comment